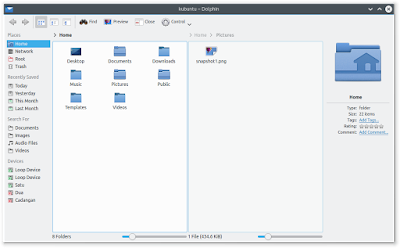
Now after Caja, we bring Dolphin. It is KDE file manager. We find Dolphin on Kubuntu, openSUSE, Slackware, or any other distro using KDE. We will explain briwfly how to use Dolphin to manage file and folder in Linux. We use Dolphin 14.12.3 in Kubuntu 15.04 here. We hope this will help any new users. Enjoy.

Overview


  1. Main toolbar. It consists of toolbar itself plus Control button (menubar inside a button, just like latest Chrome or Firefox web browser).
  2. Address bar (breadcrumb or text).
  3. Left Sidebar. By default, Dolphin has Places style.
  4. Status bar. It consists of status indicator, zoom slider, or folder size bar.
  5. Right Sidebar. By default, it is file preview panel.

Concepts

  1. Dolphin is an advanced file manager. By functionality, it is closer to Windows Explorer than any other file manager programs.
  2. Dolphin has split view, tree view, and show in groups feature while another file managers don't have it anymore.
  3. Dolphin builds its visual appearances from components. Sometimes it is toolbar, sometimes it is panel. Every component can be added, modified, or removed. So it is possible to create custom toolbar with your choosen buttons in Dolphin, just like LibreOffice Writer toolbars.
  4. Dolphin has many panels. For example, tree view in Dolphin is treated as a special panel, named Folders Panel (F7).
  5. Dolphin doesn't have menubar by default, moved into single button Control.

Split View

To split view in Dolphin, press F3. Press it again to revert back.


New Tab

To open a new tab, press Ctrl+T. Press Ctrl+W to close it.

New Folder

To create a new folder, right-click main area > Create New > Folder. You can't use Ctrl+Shift+N by default because that shortcut has been used as New Window.


Sort By

Dolphin is the only one file manager to do file sorting (by date or else) + Show in Groups. This feature can help us to easily differ a file from a another files in a folder. You ill find this feature in Windows Explorer too. To achieve this,
  1. Open menu Control > Sort By > Date then select Descending.
  2. Open menu Control > Sort By > Descending.
  3. Open menu Control > Show in Groups.
This is our default view in Dolphin. If you want the other, change Date by Name, Type, or Size.


Search

To search file in Dolphin, press Ctrl+F. Press Esc to revert back. Remember that KDE Baloo component needs some times (a few minutes) since the first run to index your files. Baloo is the new Nepomuk, the file indexing service in KDE. Baloo in KDE is similar with Google Search Engine in the web.


Tree View

Tree view in Dolphin is achieved by adding Tree Panel (Folders Panel) manually. To do it, press F7 or access Control > Panels > Folders. See picture below. Red box means how to do it, green box means the result. You may edit the panel positions by unlocking panel first then drag them then lock them again.


Change Folder Logo

To change folder image, right-click a folder > Properties > click folder logo > select one image. In this example, we change default logo into red folder logo.


Integrated Terminal

To open Terminal directly inside Dolphin, press F4. To close it, press F4 again. It is an embedded Terminal, no need to open different window. Probably it is the most used/needed Dolphin feature for a Linux user.


After PCManFM, we introduce here basic Caja File Manager usage. Caja is a descendant from the old Nautilus from GNOME 2.x era. You will find Caja File Manager in Ubuntu MATE, Linux Mint MATE, or any other distribution using MATE as its desktop environment.  It keeps many features from the past, such as emblems and split views. We use Caja 1.8.2 from Ubuntu MATE 14.04 here. We hope this will help new users. Enjoy.

We find many MySQL tutorials worldwide. But this tutorial is intended for beginners in Ubuntu. This covers installation of MySQL itself and then some basic MySQL queries such as creating and updating table. This works with Kubuntu, Xubuntu, and another official flavors of Ubuntu because they use the same repository. We hope this helps any programmer comes into Ubuntu to deal with MySQL.

We've written article about Ubuntu 15.10 release yesterday. Here we write few things we will always do after installing Ubuntu 15.10. All things we do can be done by point and click without Terminal.

At October 22th 2015, Ubuntu 15.04 Wily Werewolf was released. The Ubuntu "brothers" (Xubuntu, Lubuntu, Kubuntu, Ubuntu GNOME, Ubuntu MATE, Ubuntu Kylin, and UbuntuStudio) were also released. Actually there are no big changes from previous 15.04 release but we've got some updates. We'll see what's new and of course the download links.

Ubuntu gives us easy way to bind a shortcut key with any program. Suppose you want to open Firefox when Win+G are pressed. Or press Win+H to open text editor. This can be achieved by using internal Ubuntu System Settings. You don't need to install any external program.


After Thunar, we come with PCManFM. This is the LXDE file manager. You'll find PCManFM in Lubuntu. PCManFM is a very lightweight file manager yet powerful. It has search facility, something Thunar doesn't. It has F3 Split View also, something Nautilus doesn't anymore. And just like another file managers available in Linux, it has multitab feature. We hope this article helps anyone using Lubuntu or any LXDE based Linux everywhere. Enjoy.

After Nemo and Nautilus, now we bring you Thunar. It is one of the simplest file manager (graphical) available in Linux. Simple means Thunar is easy to use. We will cover some important features of Thunar. We hope it helps new users into Xubuntu or any XFCE based Linux distro.

In Dolphin, by using an extension, I can do right-click to convert bulk PNG images into JPEG or any format. This is very effective (I use it very intensely) for my graphic design works. But how about Nautilus? Sure, you can do the same thing. You will need to install programs nautilus-image-converter (resizer) and nautilus-image-tools (converter). nautilus-image-converter created by GNOME team and nautilus-image-tools created by Atareao Team. Thank you!

After Nemo File Manager yesterday, now we bring you Nautilus here. Nautilus is predecessor for big file managers in Linux such as Nemo and Caja. We need to explain Nautilus in Ubuntu in one article. We hope this will help new users in Ubuntu. Enjoy.

In our latest article about Cinnamon, we told about tweaking. Now, we will give a basic guide about how to use Nemo. It is a file manager, a central part of Cinnamon Desktop and therefore a central too for Linux Mint (or any distro using it). You will learn basic actions in Nemo just like using Windows Explorer or Mac OS X Finder. FYI, Nemo may installed on Ubuntu if you dislike to use Nautilus (Ubuntu file manager). Enjoy.

When you install an add-on in Firefox, you will download .xpi file. This XPI extension is default format for Firefox add-on. If you have many different computers, or you often work with different computer, you may need to install same add-ons for Firefox. It's better if you know where Firefox saves XPI files so you can backup them all

When you are working with some buttons frequently, it's better you create custom toolbar for those frequent buttons. It's just like desktop shortcut for frequently used applications.

Many people ask LibreOffice Team to create equation editor in Writer. Actually, there is already that equation editor. LibreOffice Writer equation editor done with LibreOffice Math. And LibreOffice doesn't call it equation, LibreOffice calls it formula. We just need to know how to use it. Here, we will insert equations inside Writer document.

I've got a new handheld device Sony Ericsson Xperia ST25i with Android operating system recently. This device has internal storage only, it has no external storage. I tried to connect it in my Ubuntu 12.04 but my file manager (Dolphin) could only read and could not write into its storage. And you know, Sony PC Companion program (tool for transferring files into Xperia) is not available for Linux until today. So, I try Ubuntu 15.04 today. You may do it from LiveCD. Out of the box, Ubuntu detects my Xperia easily and I can read or write any files (create folder, copy MP3, copy images, etc.) into my Xperia. You don't need to install anything. By using this, you don't need Sony PC Companion again. I want to share it here.