Showing posts with label Networking. Show all posts

This tutorial will explain for QEMU virtual machine users how you can make two-ways network connection between host and guest on Ubuntu Desktop. This enables internet access automatically for the guest if available on the host. This tutorial gives you an example exercise, that is, to remote login with SSH from host to guest and reversely from guest to host. Now let's start!

Subscribe to UbuntuBuzz Telegram Channel to get article updates.


With LibreOffice Draw, you can make network diagram just like you did with Visio (or GNS3 or even Cisco Packet Tracer). The problem is that icons for networking, such as server, router, firewall, workstation, cloud, etc. are not included by default. Fortunately, the solution is you can add such icons as plugins in Draw and then use it to make diagram.  Thanks to the awesome VRT project, now we have it on LibreOffice. This tutorial explains step by step to install VRT extension into LibreOffice Draw until you can see networking icons available. Enjoy!


Subscribe to UbuntuBuzz Telegram Channel to get article updates directly.

nload is a command line tool to measure network usage in real time. nload is a free software by Roland Riegel. nload is very lightweight but it has good interface similar to bwmonitor in Windows. This article tells some examples of nload for personal user need.


When the first time i come to Ubuntubuzz, i said that i will write posts about networking in Ubuntu. Especially about how to adminisiter a Server with Ubuntu. Yeah, start from the installation of Ubuntu Server to installation all of services that are needed by a Server. I hope you'll like it and useful for you as well. :)

In this first chance, i will guide you about how to install Ubuntu Server 12.04 LTS in your PC. Why i still use 12.04 version? It is because the 12.04 version, is a Long Term Support. As you know, LTS version is designed for Server use, because of its realibility and its long support. So, if you consider to use Ubuntu as your Server, use the newest LTS version which now is Ubuntu 12.04 LTS.

Okay, now lets begin the main part.

1. The first, prepare your installation CD. If you dont have it, you can download the image file from the Official Ubuntu website. After you finished, burn it to a blank disc with Brasero or Nero or another burning application you like.

2. Now, you already have the installation CD. But, you still have to do something before starting the installation. Go to your PC BIOS setting with pressing F1, F12, or Delete button and go to the boot settings. Set the First Boot to CD Rom as you can see at the picture below.
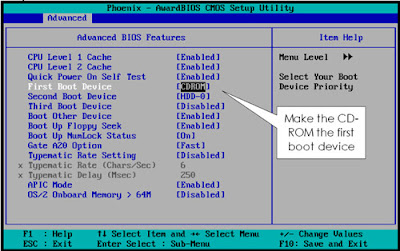

3. After that, put the installation CD to your CD/DVD Rom. If your PC success to boot from CD/DVD Rom, you'll see this picture. Choose Install Ubuntu Server.


4. In this Language Selection Part, just select English.


5. Next, you'll need to select your Country Location. If you live in Indonesia (same like me :D), choose other > Asia > Indonesia and press Enter.


6. After that you will be asked to choose your Country Locales base. Almost all of Indonesian PC usually use United States.


7. If appear Picture like below, just choose No. Because we will choose the Keyboard Layout manually.


8. Like Locales setting, almost all of Indonesian PC usually use English US as default keyboard layout. Choose English (US) > English US.


9. Then, this is the Network Configuration part. I use two Network Interface Card, so it will show two configuration like this. Just select one of them, eth0 or eth1.


If you ask me about the IP Address configuration, i cannot answer it. Because it's depend on your own ISP configuration. Either Dynamic IP or Static IP. In this case, i use Dynamic configuration so when Ubuntu configuring the network with DHCP, it will be succeeded like this.


But, if your IP configuration is static, in this part you will fail. Dont worry, just select Configure Network Manually and fill in the configuration depend on your ISP configuration that they gave to you.


Example :


10. The next part is hostname configuration. Hostname is name of your computer. Just fill it with one name that you want.
Note: Dont use space okay!


11. Then, you need to input your domain name too. Remember, this domain just can be used in local network only. So don't use top level domain which used in the internet like .com, .org, .net or another else. Because i'm afraid your local domain will conflicting with internet domain. Use top level domain that doesn't exist in internet like .handsome, .beautiful, etc. Domain that i use in this post is belajar.cilsy.


12. Now, you are going to the Setup Username and Password part. The first, you are asked to input your Full Name. So, fill it.


Input your username too.


And input your new user password twice. One for the new password itself, and one for confirmation. Remember, do not ever use weak password! Always use words, number, capital words, and special character combination.


13. Choose No, if it ask you to encrypt your home directory.


14. After that, you will go to the Setup Clock part. If you're connected to the internet, Ubuntu will configuring your clock automatically like the image shown below. If it is correct, select Yes.


15. Partition part is the most difficult part of installation Ubuntu Server 12.04 LTS i think. Because for almost all beginner user think that Linux partition is definitely different with Windows partition. So be carefull guys! I really recommend you to backup all of your important data before you continue to this step. "Sounds this step is so hard and dangerous, so what i have to do to avoid the worst risk?". Don't worry, if you dont know how to make the partition, just choose Guided - use entire disk. The System will make the best partition for your hard disk automatically.


But if you thing that you can make your own partition, i recommend you to select Manual.


After that, select your Hard Disk.


Finally select Yes to write your changes to the disk.


16. When the process running, suddenly you see a form that ask you to fill a HTTP Proxy address. Just leave it blank then select Continue.


17. For the security reasons, in this part i recommend you to choose Install Security Updates Automaticcally because it will make your Ubuntu more safely.


18. Now, here is the Software Selection part. Ubuntu ask you to choose what softwares you want to install. Dont check anything and just leave it as default. Because with let your Server be a really fresh system is a good thing. You can install any software and service which you want after the installation process finished.


19. Finally, this is the last part. Choose Yes in this Installation GRUB Boot Loader part.


20. Now your installation is finished. Select Continue to reboot to your new Ubuntu system.


That's it.

Hope this post useful for you :)

I have written a post about using Pidgin to chat and file transfer over Local Area Network (LAN) with some tricks. There is another application which can do file transfer over LAN easily, just install it on both computers, and you are ready to go. Introducing Nitroshare!

Not only Ubuntu, sometimes we needed to work with other OS like windows in office or somewhere else. When we're not face directly with our computer (Ubuntu), can we monitor it ?, yes, you can !, you can do it via remote desktop connection.

Ubuntu as a part of Linux has provide some ports which commonly used as remote protocol, that is ssh (port 22) and telnet (port 21). If you are accustomed to use terminal you can use both of port above, but if you are not accustomed to, you can do it via VNC.


What is VNC ?
Virtual Network Computing (VNC) is a graphical desktop sharing system that uses the RFB protocol to remotely control another computer. It transmits the keyboard and mouse events from one computer to another, relaying the graphical screen updates back in the other direction, over a network. VNC is platform-independent – a VNC viewer on one operating system may connect to a VNC server on the same or any other operating system, (Wikipedia).

Dear Readers! How are you doing? I hope everything is well. Today I'd like to show you how to use Pidgin for chatting and transferring files on local network. You can do this even without Internet connection. Let's get started.


Continue what we write in "running graphical cisco network simulator in ubuntu", We would like to introduce one of official cisco network simulation program which frequently used by poeple which would take a Cisco test like CCNA, CCDA, CCNP, CCDP, CCSP, CCVP, and CCNA Security, for those who are familiar with cisco must be known with "Packet Tracer", this application now up to version 5.3 (if i'm not mistake) and available in both Windows and Linux.

Cisco Packet Tracer is a Official network simulation program by Cisco that allows users to experiment with network behavior. As an integral part of the Networking Academy comprehensive learning experience, Packet Tracer provides simulation, visualization, authoring, assessment, and collaboration capabilities and facilitates the teaching and learning of complex technology concepts.

Packet Tracer has available in ubuntu and other linux distro with various source installer (.bin .deb .rpm), this Article we will discuss about How to install Cisco Packet Tracer 5.3 in Ubuntu. Following step by step installing Packet tracer 5.3 in Ubuntu :

Packet Tracer 5.3 About Page
Download Packet Tracer 5.3 Source Installer
As mention above, packet tracer 5.3 available in various source installer, for those ubuntu user we suggest to choose .deb or .bin to get better compatibility, If you are student of Cisco Network Academy just sign-in and download fresh Packet Tracer DEB package from there. Notice you should find there Linux/Ubuntu version of Packet Tracer instead of binary .exe file for Windows, otherways you can download  packet tracer 5.3 through following links :


Whatever operating system (O/S) had installed, one of important jobs they must can do is "work every where, work any where", in this part we will stress our topic with how to let our printer use by other (sharing) via CUPS (Common Unix Printing System). The Common Unix Printing System, allows a computer to act as a print server. A computer running CUPS is a host that can accept print jobs from client computers, process them, and send them to the appropriate printer. For Example we will use Printer HP Laser Jet 1020 as object:
Go to System> Administration> Printing Printing after a window pops up then click Servers> New> Printers and follow the picture below
Step 1
  • Choose Windows Printer via SAMBA, then click the Browse button then it will continue the process of scanning ... select the printer that has be shared and then click OK. To ensure click the Verify button and make sure the dialog box Print Share Verified exit. Then click Forward


Data is an important asset owned by company, data which is the raw of information require a necessary method how keep and preserve well, to reduce the impact of damage and data loss which possibility occur. Backup and restore procedure that a part of disaster recovery planning is one of the way that can be perform to reduce the impact of data disaster. From statement above we can conclude that  all of us need to ensure all important data of us or our company must be backup well. And now the answer is, how to design a reliable backup and restore system which can run on linux ?
To design or build backup and restore system we must have reliable tool to move data from source to destination via network, lucky we have rsync running in linux operating system. Rsync is such application which can move data (use incremental method) from one computer to another through ftp, scp, and ssh, rsync is small and multi perform application which can be use as server or client.  

Step 1
First time before you start build a system we must describe what system we want to build otherwords describe fungsional and non fungsional sytem requirement then design the layout of application.

Step 2
Step 2 we must prepare our system and install all required application, for this section for required application we can install ssh-server, mysql5.0-server, and rsync as main application. with no less important  don't forget to describe supporting factors such database design, working directory, and previllages user to run.

Step 3
Important part of backup and restore system is script to copy/move data form one computer to another, for this section i have provide some script write in bash language that found in internet then modified it then you can download by following this link. Maybe you can't use script given directly, you can modified that script and fit to your system.  I will give explanation to have clear illustration, you can open the script while read this.
  • This script is running by cron, work valid by parameter save in file (/var/www/LIBT/exec/. That file configuration contain of  backup parameter such us name of session, rsync parameter, source and destination mechines. this file writen by application interface (you can build by your self) which help user to descibe backup session they want to build.
  • This script work to manage/colaborate supported application like rsync, mv, cp, mysql, chmod, chown, etc.
  • Plot of backup procedure of this script is  -- [read configuration file] -- [check input parameter given] -- [decide local/remote backup] -- [perform backup/rotate backup] -- [write log/give feedback]-- .This script can due incremental backup so if you have running the same backup before, system will save previous data backup and make a new copy of data backup, this important procedure can be use to implemented restore point.


Cisco IOS is an operating system by Cisco System which offer a better way to build a managable netwok interconnection, this operating system used on the vast majority of Cisco Router and Cisco Network Switch. As article i wrote in ubuntubuzz, here the list of Cisco IOS can be used for GNS3, Dynamips, or Dynagen :

Dear visitor,
We were sorry that we can't provide free download cisco ios images on this page (anymore), we afraid of breaking "Free Open Source Software" rule and violate some cisco authorities about legal software, very unfortunate that Cisco does not provide any flexibility to CCNA, CCNP, CCIE students to learn more about cisco Routers/Switch by provide a free IOS For Download. 


For complete instruction the way to use Cisco IOS for simulating a Cisco Router and Cisco Network Switch, see my previous article here.

Cisco Network is well perform network equipment and platform, there are many companys in the world entrust their network being handle by this instrument. A lot of advantages we get if we know much about this network equipment eventhough it's not simple way to learn more about all Cisco Netwok familly. 

Not only Microsoft, Java, or Oracle, Cisco System provide Cisco Netwok Career Certifications which provide profesional IT certification for Cisco System Product such us CCNA, CCDA, CCNP, CCDP, CCSP, CCVP, and CCNA Security. There are five levels of certification: Entry, Associate, Professional, Expert, and Architect, as well as seven different paths, Routing & Switching, Design, Network Security, Service Provider, Storage Networking, Voice, and Wireless.

My personal opinion Cisco Netwok Career Certifications is not cheap, but it's very important for profesional network engginer to have it.  get the best preparation is the best effort we can do. There are many network/cisco simulator in a market as we know Boson, Networksim and All official Network simulator form Cisco System that can be install in our desktop and we can learn from it.

Some people ask 'how can i use program such us Internet Download Manager (IDM) in Linux ?'. Yes !!!, to get a file or download in internet is an absolute activity now days, by download manager/accelerator having download is more easy and fast, Here the 5 Recommended Linux Download Manager/Accelerator Program widely use in linux.
Multiget 
MultiGet is an easy-to-use GUI file downloader for Windows/Linux/BSDs/MacOs.  It's programmed in C++ and has a GUI based on wxWidgets. It supports HTTP/FTP protocols which covers the requirements of most users. It supports multi-task with multi-thread on multi-server. It supports resuming downloads if the Web server supports it, and if you like, you can reconfig the thread number without stopping the current task. It's also support SOCKS 4,4a,5 proxy, ftp proxy, http proxy. (http://multiget.sourceforge.net/). Folow this link to download Multiget.