
This tutorial explains easy steps to create wifi hotspot on Ubuntu laptop. With this you can share an internet access with friends and your other devices. It is very simple everyone can do. You don't need to install any application nor using terminal. This is based on Focal Fossa but certainly you can practice on prior or later versions too as long as their desktop is GNOME 3 such as Bionic Beaver or Groovy Gorilla versions. Happy sharing!

Subscribe to UbuntuBuzz Telegram Channel to get article updates.
1. Connect Cable Internet
Best example is an Android phone with data access. Get a usb cable > connect phone to laptop > enable usb tethering on phone > Ubuntu laptop now connected to the internet. If you have ADSL cable access instead, make it so that Ubuntu can connect using cable not wifi. First step finished.
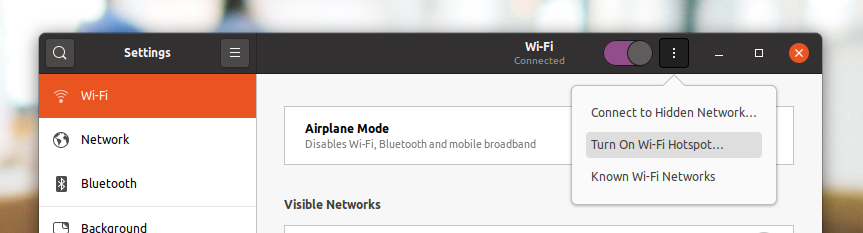
2. Create A Wifi Hotspot
On Ubuntu laptop go to Settings > Wifi > open triple dots menu on top > Turn On Wifi Hotspot > pick a name of your hotspot e.g. "MyHotspot" > pick a password so only people you trust can join e.g. "P@ss_W0rd" > hotspot created. Second step finished.
3. Tell Your Friends
Now you friends with other laptops and phones can find your hotspot "MyHotSpot" by entering the password above. They now can surf the internet through your Ubuntu machine. Final step finished. Happy sharing!
Turn Off Hotspot
Go to system tray > Turn Off Hotspot > your hotspot deactivated. This way your friends cannot connect anymore to you over your wifi.
Wifi To Wifi (Special)
To do wifi to wifi, not cable to wifi like above, you need 2 wifi devices in your Ubuntu laptop. You will need this mostly in a public hotspot. In practice, this means for example you use your laptop with one additional external usb wifi (you can buy one at computer store). You cannot do this with only 1 wifi device.One wifi acts as receiver and one wifi acts as transmitter. Follow our previous tutorial to do that.
Hope this helps a lot!
This article is licensed under CC BY-SA 3.0.