
SLAX is a portable desktop operating system designed to run on removable media like USB stick. We covered it yesterday in a short review. However, we didn't make it clear how to make its bootable media. It's different to Ubuntu and another standard GNU/Linux distros in the making of its bootable as we cannot use image writing utilities like Rufus or Unetbootin. For that purpose, now we share with you how to make it from start to finish.

Subscribe to UbuntuBuzz Telegram Channel to get article updates.
Requirements
- Intel or AMD processor (32-bit for 32bit version, 64-bit for 64bit version)
- 128 MB RAM
- USB flash drive or CD as media
- FAT32 or EXT4 filesystem for the USB
- Singleboot, you can make the USB multiboot with other distros
1. Format The USB
Firstly, we format the flash drive to FAT32 filesystem:
• Plug the flash drive to USB port.
• On Ubuntu, run Disks.
• Select the flash drive inserted.
• Click hamburger menu on top-right, select Format.
• Select FAT32 as filesystem.
• Format.
Flash drive formatted.
2. Download SLAX
• 32bit slax-32bit-11.2.0.iso
• 64bit slax-64bit-11.2.0.iso
In the future, visit https://slax.org to get the latest version.
Get a copy of SLAX from links above.
3. Extract Image File
• Your SLAX image file is either slax-64bit-11.2.0.iso or slax-32-bit-11.2.0.iso.
• Right-click the file, Open With Disk Image Mounter.
• SLAX mounted as a new drive on the left sidebar.
• Open the SLAX drive.
You will find a directory and a file named /slax/ and readme.txt, respectively.
4. Copy SLAX Directory
• Right-click /slax/ directory, Copy.
• Open the blank USB flash drive.
• Right-click, Paste.
• The /slax/ directory copied to flash drive.
5. Run Setup Script
• Open the /slax/boot/ directory in the flash drive.
• You will find two files named bootinst.bat and bootinst.sh.
• Right-click blank area, Open in Terminal.
• A Terminal will open in the flash drive.
• Run the command line below:
$ sudo ./bootinst.bat
• Wait for the process to finish.
• Once finished, there will be a message saying:
Boot installation finished // Press ENTER
• Finally, press Enter.
You finished installing SLAX into flash drive.

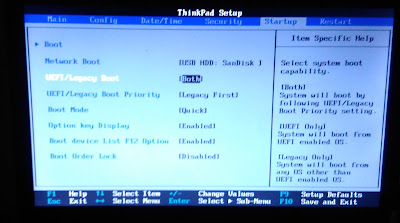
6. Configure BIOS
We managed to boot SLAX 11 with BIOS configuration as the following:
- Computer: Lenovo ThinkPad T430
- BIOS version : 2012
- Technology supported: BIOS Legacy and UEFI
- Booting setup: Both, Legacy First
- USB booting: enabled
7. Boot SLAX
- Reboot the computer.
- SLAX green flower will appear on screen.
- Let the countdown runs, otherwise press ESC to select an option.
- SLAX booting itself quickly.
- SLAX desktop will be displayed.

This article is licensed under CC BY-SA 3.0.