
This tutorial explains briefly how we work with LibreOffice Writer's user interface. This includes its Menubar, Toolbar, Sidebar, Statusbar, and Window in general, particularly frequently used buttons. The goal is for us to familiarize the most important features first in Writer. This article is intended for beginning LibreOffice users even if they are also new in computing. Happy learning!

(Writer 6 appearance on Ubuntu operating system)
Subscribe to UbuntuBuzz Telegram Channel to get article updates directly.On LibreOffice: Startup | Table of Contents | Table of Pictures | Cropping | Columns | Lorem Ipsum | Portable Version | A/F/S | Version 6.2 | Bibliography | Zotero
Things To Learn
- 1. Screen
- 2. Titlebar
- 3. Menubar & Toolbar
- 4. Submenu
- 5. Main Area & Sidebar
- 6. Statusbar
- 7. Important Buttons
- 8. Important Menus
Starting Point
See Running LibreOffice Writer about starting the program.
Whenever you start LibreOffice, you may encounter its welcome dialog with buttons to create new documents in Writer word processor, Calc spreadsheet, Impress presentation, and others. It shows you recently edited documents if any. The more you edit documents, the more recent items showed here. The purpose of this starting point is to ease you to access all of your existing documents and create new ones. To create new Writer document, simply click blue button Writer Document on the left.

1. Window
A LibreOffice Writer window looks like this on version 6.2. Whether you run Writer on other OS or with other version number, the look should be similar. There are 6 parts of Writer window:
- 1. Titlebar
- 2. Menubar
- 3. Ruler
- 4. Page area
- 5. Sidebar
- 6. Statusbar

2. Titlebar
A titlebar is top part of a Writer window where you can see file name of your document. A new document normally displays "Untitled" followed by a number as its title. An opened document displays filename with extension, for example, bookindex.odt, where bookindex is filename and .odt is extension.

3. Menubar and Toolbar
Menubar is the top panel below titlebar which starts with File, Edit, View, etc. ends with Help individual menus. Toolbar is the colorful buttons panel starts with New, Open, Save, PDF, Print buttons.

3.1 Menubar
To understand menubar quickly, I picked first three menus:
- File
- Edit
- View

(Red: File menu, yellow: Edit menu, Green: view menu; notice the shortcut keys in dashed-line boxes)
Every menu contains functionalities. For example, first menu File, covers functionalities such as creating, opening, and saving file; second menu Edit, covers functionalities such as undo, redo, copy & paste, and find to manipulate text; third menu View covers functionalities such as changing display mode, enabling/disabling certain user interface parts, and zoom; and so on.
3.2 Toolbar
To understand toolbar quickly, let's see 1st line toolbar:

Toolbar consists of buttons. Some buttons can only be clicked, some others --with black triangle sign-- can show menus. First line one is called Standard Toolbar, while second one below is Formatting Toolbar, and beyond these there are still many other toolbars you can enable under menubar View > Toolbar.
First line, Standard Toolbar, consists of important buttons such as New, Open, Save, etc. It is actually a summary of menubars File, Edit, and Insert.
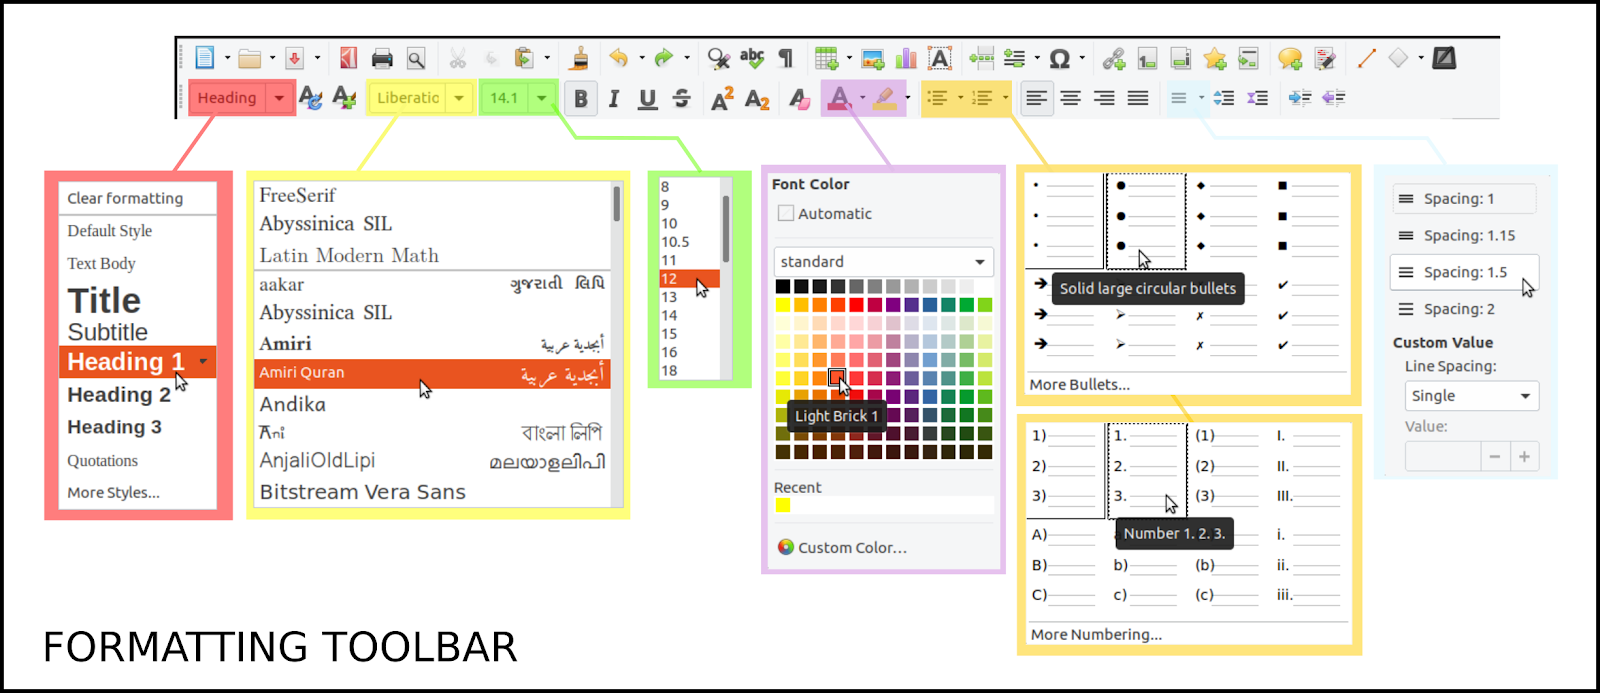
Second line, Formatting Toolbar, consists of finer editing buttons, such as (like picture above): heading, font (typeface), and its size selections; following font color, bullets & numberings, and spacing selections. The standard formatting, Bold-Italic-Underline buttons, are also there.
4. Submenu
Every menu may have submenu. Here we will learn from first menu, File, as using other menus are not different.
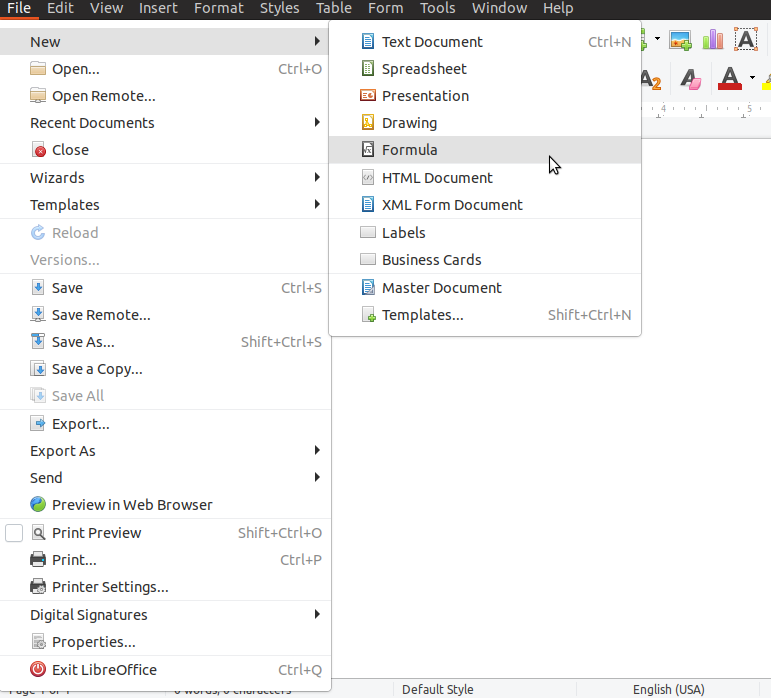
4.1 File > New
See the first submenu, File > New > you see options like Text Documents, Spreadsheet, Presentation, ..., until Templates. With that, you create a new document file.
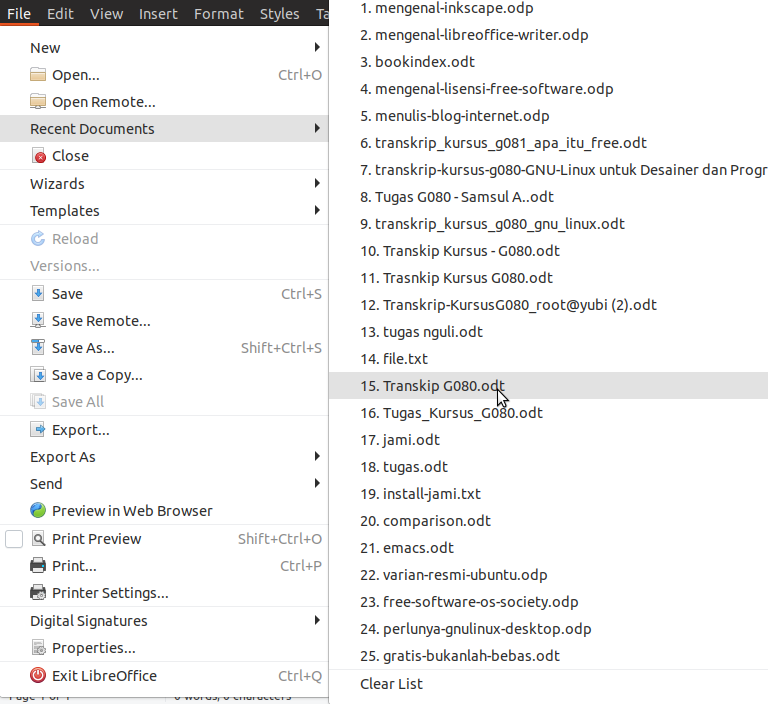
4.2 File > Recent Documents
Another example, see second submenu File > Recent Documents > you see latest opened document files. For example if there are 5 file names there, you can select file number 1 to open the most recent document.
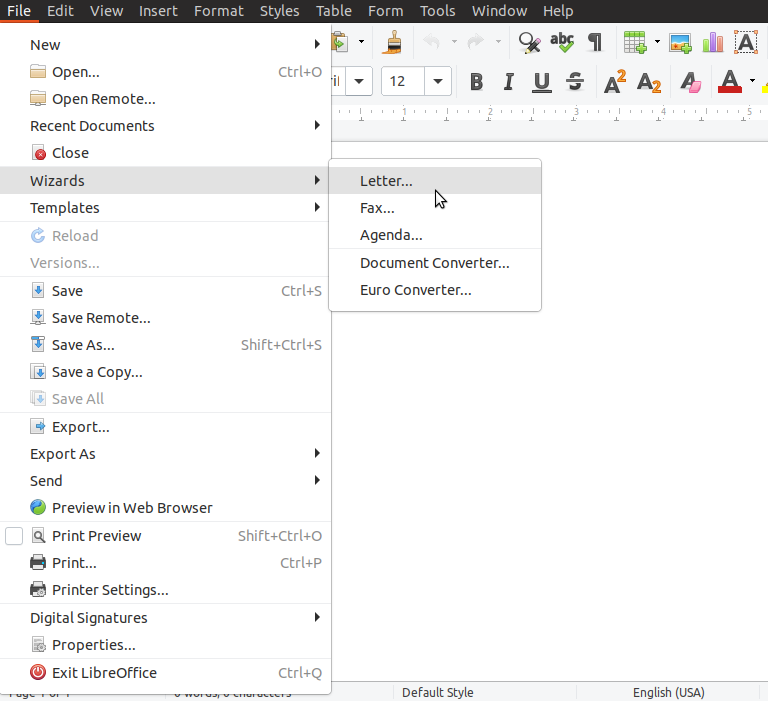
4.3 File > Wizards > Letter / Fax / Agenda
Last example, third submenu File > Wizards > Letter / Fax / Agenda. This menu is an automatic maker for mentioned things. For example, you can generate a professional letter with Letter submenu.
5. Main Area and Sidebar
Largest area of a word processor is the page area where we write there. LibreOffice Writer displays a white A4-sized page surrounded by grey background as the main area. On this main area, you will find a blinking cursor for keyboard and a text editing symbol for mouse. Whenever you type with keyboard, blinking cursor will follow your keystroke. Whenever you move your mouse over white page, the pointer will turn into editing symbol.

On the right side, there is Sidebar, a multipurpose panel that provides formatting, page formatting, styles, gallery, and navigator. Sidebar can be shown/hidden by clicking the vertical handle with white triangle on right side.
6. Statusbar
This part displays page number, number of words, selected text style, language, page display mode, and zoom slider. Statusbar is about seeing: it's handy to quickly see status of current document & adjust its view so you can look the pages better. Statusbar is also about instant changing: right-click one part to change the status quickly.

There are 10 parts of Writer statusbar:
- 1. Page number/total
- 2. Word count, character count
- 3. Page style
- 4. Language of document
- 5. Typing mode
- 6. Selection mode
- 7. Save status
- 8. Signature status
- 9. Page display mode
- 10. Zoom

6.1 Page Number
It shows current page against total page numbers.
6.2. Words and chars
It shows total words and total characters in a Writer document.
6.3. Page Style
It shows style of selected page where the cursor currently placed. To change style, right-click this and select one among styles available.

6.4 Language
It shows language of current document. Language here means the Spelling & Grammar Suggestion system to help you type without mistakes in language you choose. To change language, right-click this and select language available.

6.5 Insert/Overwrite
By default typing mode in Writer is called Insert. This mode does not show any text on statusbar. This mode means normal, your typing types letter like usual. In contrast, there is another mode called Overwrite, where your cursor turns thicker and typing will overwrite letter under it. To change between modes, press Insert key or simply click this 5th part statusbar.
6.6 Selection Mode
There are several modes of selection: Standard, Extended, Adding, and Block. The normal mode is Standard. This allows you to select text by moving hold-click (mouse) or by Shift+Arrow Keys (keyboard).

For example, compare between:
Normal selection, and

block selection:

6.7 Change Indicator
Grey means unmodified since last saved. Red means changed and unsaved.
6.8 Signature
Digitally signed document shows signature logo. Unsigned document does not show anything.
6.9 Display Mode
By default display mode of Writer is Single View. But there are Multiple-Page View and also Book View available. Normally user uses the first, but to see many pages in 1 screen user may use second one; and use third one to see dual-paging like reading a book.

(Example of a document displayed in multiple-page view can display 5x2 pages in 1 screen)
6.10 Zoom
To zoom out (see text smaller) or zoom in (see text larger), slide the slider button or click the - / + buttons. Alternatively, hold Ctrl key and scroll up (Zoom In) or scroll down (Zoom Out) with mouse.
7. Important Menus
There are some 10 menus that are important for every Writer user including how to open Settings dialog.
File > Save
(Ctrl+S)
To save document.
File > Save As
(Ctrl+Shift+S)
To save document but with a new name.
File > Open
(Ctrl+O)
To open an existing document.
File > Export as > Export as PDF
To save document as PDF with options.
File > Print
(Ctrl+P)
To print out document with printer machine.
Edit > Copy
(Ctrl+C)
Copy selected text.
Edit > Paste
(Ctrl+V)
Paste copied text.
Edit > Find
(Ctrl+F)
To find a text in whole text.
Edit > Find & Replace
(Ctrl+H)
To find text and replace it with new text.
View > Full Screen
(Shift+Ctrl+J)
Enlarge page area and hide all toolbars to make editing space wider.
Tools > Options
(Alt+F12)
Open Settings dialog to enable/disable features or adjust/switch options in Writer.
More menus you will discover by experiences over time.
8. Important Buttons
There are some 10 buttons you will often use in Writer. These buttons are also often used in other word processor programs.

New
(Ctrl+N)
Create new file in Writer.

Save
(Ctrl+S)
Save document.

Export as PDF
Save as Portable Document Format (PDF) file, readable in all computers and smartphones.

Open
(Ctrl+O)
Open document.

Bold
(Ctrl+B)
Make selected text thicker.

Italic
(Ctrl+I)
Make selected text slants slightly to the right.

Underline
(Ctrl+U)
Make horizontal line under selected text.

Strikethrough
Make selected text

Uppercase
Make selected text UPPERCASED.

Lowercase
Make selected text lowercased.

Superscript
Make selected text raised vertically.

Subscript
Make selected text dropped vertically.

Undo
(Ctrl+Z)
Go back one step before a change made.

Redo
(Ctrl+Y)
Go further one step after an undo made.

Table
Create a table by drag and drop rows x columns.
More buttons you will also discover by experiences.
Further Reading
- Writer Documentation
- Writer Guide Books
- LibreOffice: Signing Document
- Download LibreOffice Buttons Set
- Insert Key
This article is licensed under CC BY-SA 3.0.