
Welcome to the 1st part of computer graphic design for students. This is your easy guide to learn graphic editing with the software Inkscape. In this article you will learn both the theory and practice and followed by an exercise making your first design with logo and typography. Enjoy!


Subscribe to UbuntuBuzz Telegram Channel to get article updates.
About Graphic Design
It is the making and editing of visual artworks. It is available both on screen or on paper. Creating logos, planning products, drawing illustration, making typography, drawing illustration, are parts of graphic design. When we hear this term, it is often intended digitally that is graphic design done using computer. This series talk about digital graphic design by using the software Inkscape.
About Vector Images
Digital pictures are generally divided into two kinds namely bitmap and vector. Mostly photos and images you see on screen or take with camera are bitmap, meaning, map of bits, kind of digital images that consists of pixels following the dimension of width and height. Particularly, when zoomed or resized out this kind of pictures will be stretched. For example, image files with png or jpeg format are bitmaps. On the contrary, there are digital images that consists of values of width and height itself and will not stretched while zoomed or resized out that is called vector. For example, image files with ai, cdr or svg format are vectors. The purpose of vector images is mostly to create designs as it can be exported as bitmap images later. That is why people create logos and other creative design in vector graphics so that later can be exported to any bitmap format they wish. To edit vector images you need vector image editor. There are Adobe Illustrator, CorelDRAW, and Inkscape which are commonly known as computer vector editing software. You will not understand what vector image is unless you practice.
About Free Software and Open Source
Free Software Definition is located at gnu.org/philosophy/free-sw.html. Open Source Definition is located at opensource.org/osd. Any software that matched FSD is called Free Software. So is for Open Source. Inkscape matched both definitions so people call Inkscape at the same time Free Software and Open Source. In particular, Inkscape is copyrighted and licensed under GNU General Public License, unlike proprietary software such as Adobe Illustrator and CorelDRAW, it is completely unlimited for commercial purposes as well as users may share the program copies as much as they wish. One picture below tells many things about Inkscape.

These are installers, source code, license, and checksum files of Inkscape. The installer files represent Inkscape is cross platform for windows (exe), gnu/linux (appimage), and macOS (dmg) platforms. This means Inkscape can run on your PCs, laptops, and Macintoshes. The source code and license files tell that Inkscape is free libre open source software. The checksum file tells that Inkscape software is secure and authentic so user feels safe which are traits special to free software community as opposed to the tradition of grabbing software from untrusted yet rather random sources. The file size tells that Inkscape is small and not bloated. All these files in one tell that Inkscape is good for you.

These are installers, source code, license, and checksum files of Inkscape. The installer files represent Inkscape is cross platform for windows (exe), gnu/linux (appimage), and macOS (dmg) platforms. This means Inkscape can run on your PCs, laptops, and Macintoshes. The source code and license files tell that Inkscape is free libre open source software. The checksum file tells that Inkscape software is secure and authentic so user feels safe which are traits special to free software community as opposed to the tradition of grabbing software from untrusted yet rather random sources. The file size tells that Inkscape is small and not bloated. All these files in one tell that Inkscape is good for you.
About Inkscape
Inkscape is a professional computer drawing program. It can be obtained gratis, easy to learn, fully unlimited to use, and can produce any kind of digital creativities as user wishes. For example, Inkscape is good for making logos, illustrations, banners, posters, flyers, business cards, user interface mockups, and many more. In licensing, it is categorized both as Free software and as Open source. In graphic design, it is categorized as vector editor. In technology, it is cross platform meaning available for all major operating systems Windows, MacOS, and GNU/Linux. In technical advantages, it is extensible as user can add new functionalities by plugins and the program itself is modifiable up to source code level. In real life, it can be considered as replacing alternative to Adobe Illustrator and CorelDRAW as Inkscape can read and write both document formats.

How To Get Inkscape
Get it from website www.inkscape.org unless your computer runs Ubuntu and GNU/Linux which can get Inkscape quicker via built-in Software Center. Picture below depicts a computer user found Inkscape in Ubuntu Software with 5 stars rating and explained as "Create and edit Scalable Vector Graphics images".


Running Inkscape
On Ubuntu computer, for example, open your menu and search for inkscape and you find the program Inkscape Vector Graphics Editor and finally run it. See picture below. On other computers, the procedures are similar. If you don't find it, it means it is not installed yet so please read section above to get Inkscape into your computer.

User Interface
Here is what you see on screen when you deal with Inkscape.

The explanation is briefly below:
- 1) Menubar: a series of function groups starts with File ends with Help.
- 2) Titlebar: a display of program's name and document's name.
- 3) Toolbar: a series of main function buttons.
- 4) Toolbox: a series of drawing tools.
- 5) Sidebar: a right positioned various options.
- 6) Colobar and statusbar: color palette and action information display.
- 7) Rulers: horizontal and vertical measurement tools.
Toolbox
Toolbox is one of the things that are most accessed in Inkscape. There are twenty tools available but you will not always use them except several ones. Every tool can be activated by a click or by pressing a particular keyboard key. When you hover mouse over a tool, you will see the tool name and its shortcut key.

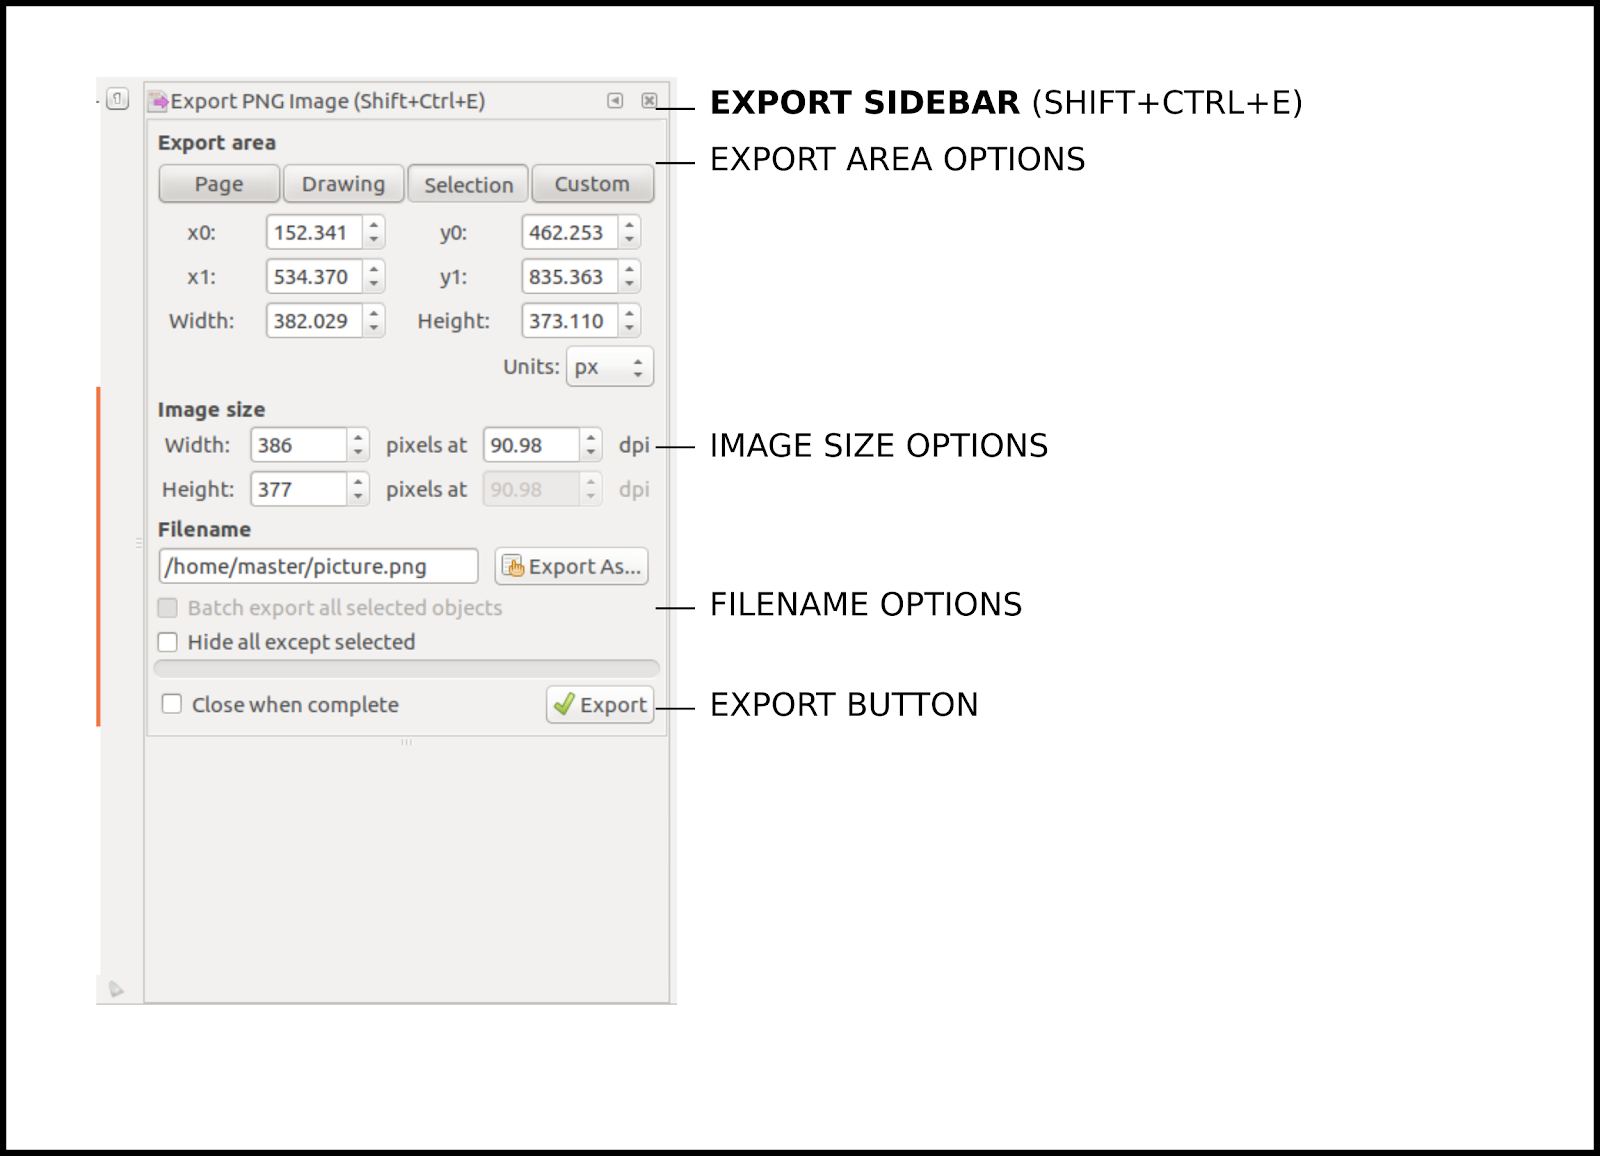
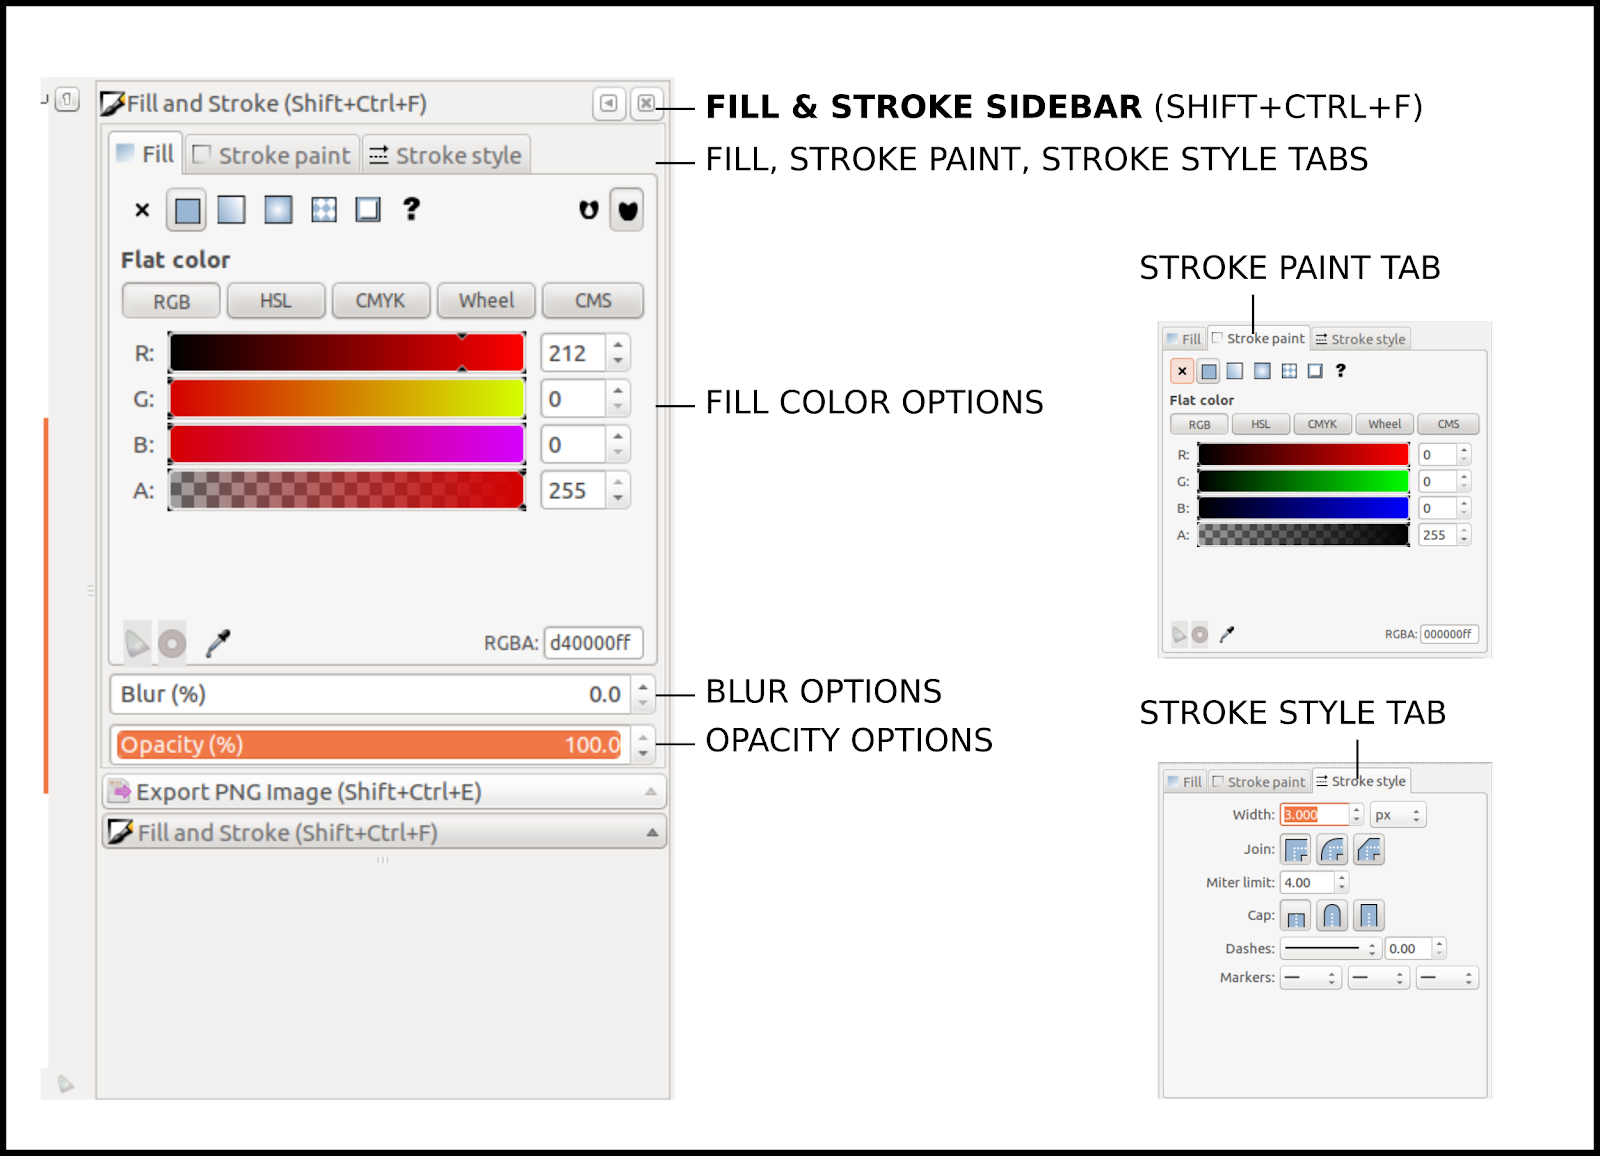
Sidebars
There are two sidebars you will use often in Inkscape they are Export and Fill & Stroke. Press Ctrl+Shift+E and Ctrl+Shift+F shortcut keys to open both respectively. You use Export Sidebar when you want to produce real images of your designs. You use Fill & Stroke Sidebar when you want to adjust color, transparency, and blurriness plus shapes of lines of your designs.
How To Play
- Cursor: clicking a tool enables that tool.
- Saving: pay attention where you save the document.
- Exporting: make sure to click Export.
Exercise
Let's exercise! Here you will learn the first basics of Inkscape. Don't afraid to make mistakes. You will do only five steps below.
- I) Create new document
- II) Make vector out of bitmap
- III) Make rectangle
- IV) Make text
- V) Combine everything
- VI) Save and export
Okay, let's go!
I) Create New Document
- Go to File > New > a blank canvas created.
II) Make Vector Out Of Bitmap
- 1) Download this logo picture in bitmap format inkscape.png.
- 2) Drag and drop logo to Inkscape canvas.
- 3) If asked, just answer with 'yes'.
- 4) Logo inserted.
- 5) Select logo item.
- 6) Go to Path > Trace Bitmap > OK.
- 7) Paint it white.
- 8) Move traced logo item from original logo under it.

- Create a rectangle by size about 4:3. It's okay to be not too precise.
- Color it red.
- Use DejaVu Bold font. It is the default on Ubuntu systems alike.
- Create text that says HELLO\nINKSCAPE wher \n is one newline.
- Give Spacing between lines = 0.77.
- Give Spacing between letters = -10.
- Resize text so its length 3/4 rectangle's, height 1/3 rectangle's.

V) Combine Everything
- 1) Move the text to bottom left corner of rectangle.
- 2) Move the logo upper left of the text.
- 3) Final picture should be like this.

V) Save and Export
- 1) Select red rectangle item. Item selected.
- 2) Press Ctrl+Shift+E keys. Export Sidebar appeared.
- 3) Select Export area = Selection.
- 4) Fill Image size = 300 dpi.
- 5) Fill Filename = drawing.png. Click Export As to select saving folder.
- 6) Click Export.
- 7) Picture saved in your selected folder.

Finished. Congratulations for you first artwork!
Summary
Up to this point, you learned at least 10 very basics graphic design movements of Inskcape namely selecting items, moving, resizing, drawing rectangle, writing text, adjusting text, coloring, tracing (translating bitmap into vector), saving and exporting. We will continue to exercise these set of movements along with this series. I hope this 1st part will be useful for you. See you next time!
to be continued...
This article is licensed under CC BY-SA 3.0.