

(BlankOn Uluwatu running from a 16GB USB stick)
This tutorial explains the installation procedures of BlankOn 11 operating system to a 16GB USB stick. This way, it's safer for your data and more portable. To practice this installation, I took off internal Hard Disk of mine and performed installation with only two USB flash drives attached: one acted as installer, one as target. After installation finished, I placed my Hard Disk back to my laptop. To warn you, my installation took so long time about 1 hour and more, longer than average GNU/Linux distros' which is about 15 minutes. While installing, you will need to watch out file size growth as the BlankOn installer --at the moment-- does not show any progress information at all. However, finally it's a success and the USB stick is now powered by BlankOn Uluwatu I can bring anywhere I go. Okay, let's proceed!
Subscribe to UbuntuBuzz Telegram Channel to get article updates directly.
Summary
In short, installing BlankOn is different in several aspects to Ubuntu:
- It cannot be made multiboot either with MultiSystem nor MultiBootUSB. It should be made singleboot with GNOME Disk Utility or such.
- It lacks progress information while installing.
- Its partitioner is reported buggy with somebody had their hard disk wiped out[1]. It's really still in development. This is why I took off my hard disk first before actually doing it.
- Ctrl+Alt+Right: switch workspace to right, to see the desktop.
- Ctrl+Alt+Left: switch workspace to left, to see the installer.
1. Create Bootable Media
Write BlankOn .iso file with GNOME Disk Utility into USB stick. However, I use BlankOn-11.0.1-desktop-amd64.iso as the image for this practice.
2. Booting & Entering the LiveCD
Boot up your computer with the BlankOn USB. Then the black screen with "Hello" and Continue using Live CD" messages appeared with timeline bar on right side of your screen.

(1st: language selector)
3. Entering LiveCD & Yellow Desktop
Do not enter Install BlankOn section first. Instead, click Continue LiveCD button so you see the yellowish BlankOn Uluwatu desktop.

(The yellow wallpaper of Uluwatu)
4. Go Back to the Installer
From the desktop, press Ctrl+Alt+Left, so you see the installer once again. Click Install Blankon button.

(1st: get ready for the installation)
5. Select Timezone
Let's continue. Here, in this example, I simply choose Asia/Jakarta.

(2nd: region selector)
6. Select Target USB
Among CruzerBlade and CruzerGlide I attached, the latter is the target I want to install BlankOn to. So I select CruzerGlide here. If you wonder why, as I said above, I had already removed my hard drive so we only see flash drives here.

(3rd: disk selector)
7. Perform Clean Install
Select Clean Install and then press Next button. This will do your BlankOn system as default setup BlankOn has into your USB stick. Yes, in this tutorial you do not need Advanced Partitioning.

(3rd: clean Install)
8. Determine Username & Password
Create your own username and password for your system. The password here will also be your sudo password.

(4th: personalization step)
9. Read Installation Summary & Proceed
For the last time, BlankOn will present you your choices. Read it carefully and make sure once again you didn't make any mistake. If anything is good, then proceed with Install button.

(5th: information being presented)
10. Progressing
You will see progress bar running on your screen. But as I said above, there is no percentage nor detailed information about what actually happened. So see next step.

(6th: installation begins)
11. See Actual Progress & Wait
Go back to desktop with Ctrl+Alt+Right so you see the yellow screen again. On this screen you can run programs.
- Run a Terminal, and invoke command:
$ cat /var/log/blankon-installer.log
- Run second Terminal, and invoke too:
$ cat /var/log/blankon-installer.parted.log
- Run third Terminal, and invoke for the last:
$ watch df /target/
Keep those 3 Terminals running to see the progress being developed. In particular, watch output of df command there, as it's the actual growing size of the target system. See pictures below.
On my system this process took almost 2 hours. You need to wait it patiently.
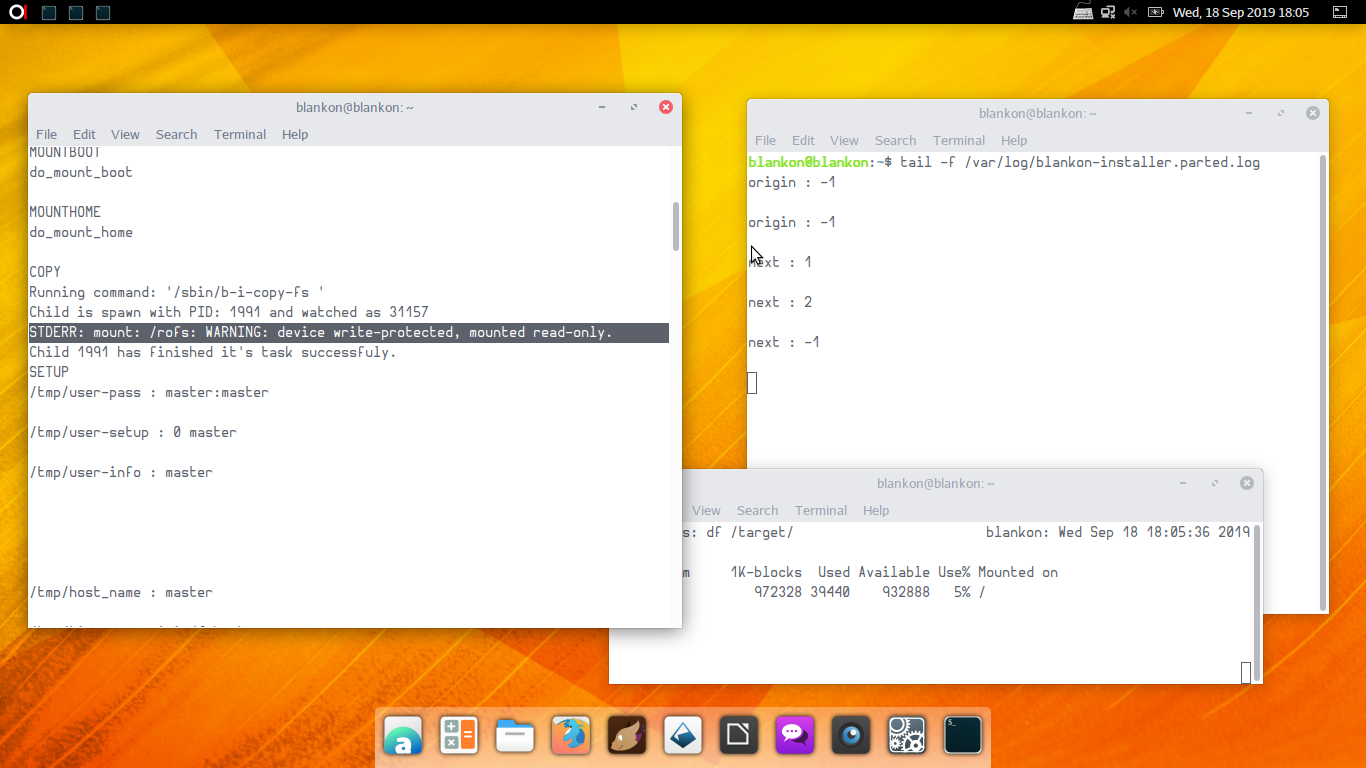
(Do not panic: the "STDERR device [...] write-protected" is okay)

(Finished installation takes up to around 38000M in Used column in df output)
Finished
Press Ctrl+Alt+Left again to check the installer. Once successfully installed, BlankOn will say "Installation Finish [sic]" and you can reboot.

(7th: finished statement)
Successful installation will give you a working USB with BlankOn Uluwatu. Happy working!
(Default setup will make root partition 14.7GB on a 16GB flash drive)
Credits
I would love to thank Derek Taylor's DistroTube channel in his BlankOn video that inspired me to do watch df above to tell BlankOn installer is progressing. I also would love to express my gratitude to all BlankOn developers for making it greater on Uluwatu. For anybody capable, if you are interested in developing and improving it, see BlankOn installer on GitHub. It's 50% written in JavaScript language right now.
This article is licensed under CC BY-SA 3.0.