When the first time i come to Ubuntubuzz, i said that i will write posts about networking in Ubuntu. Especially about how to adminisiter a Server with Ubuntu. Yeah, start from the installation of Ubuntu Server to installation all of services that are needed by a Server. I hope you'll like it and useful for you as well. :)
In this first chance, i will guide you about how to install Ubuntu Server 12.04 LTS in your PC. Why i still use 12.04 version? It is because the 12.04 version, is a Long Term Support. As you know, LTS version is designed for Server use, because of its realibility and its long support. So, if you consider to use Ubuntu as your Server, use the newest LTS version which now is Ubuntu 12.04 LTS.
Okay, now lets begin the main part.
1. The first, prepare your installation CD. If you dont have it, you can download the image file from the Official Ubuntu website. After you finished, burn it to a blank disc with Brasero or Nero or another burning application you like.
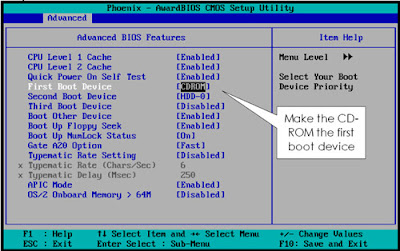
2. Now, you already have the installation CD. But, you still have to do something before starting the installation. Go to your PC BIOS setting with pressing F1, F12, or Delete button and go to the boot settings. Set the First Boot to CD Rom as you can see at the picture below.
3. After that, put the installation CD to your CD/DVD Rom. If your PC success to boot from CD/DVD Rom, you'll see this picture. Choose
Install Ubuntu Server.
4. In this Language Selection Part, just select
English.
5. Next, you'll need to select your Country Location. If you live in Indonesia (same like me :D), choose
other >
Asia >
Indonesia and press Enter.
6. After that you will be asked to choose your Country Locales base. Almost all of Indonesian PC usually use
United States.
7. If appear Picture like below, just choose No. Because we will choose the Keyboard Layout manually.
8. Like Locales setting, almost all of Indonesian PC usually use English US as default keyboard layout. Choose
English (US) >
English US.
9. Then, this is the Network Configuration part. I use two Network Interface Card, so it will show two configuration like this. Just select one of them, eth0 or eth1.
If you ask me about the IP Address configuration, i cannot answer it. Because it's depend on your own ISP configuration. Either Dynamic IP or Static IP. In this case, i use Dynamic configuration so when Ubuntu configuring the network with DHCP, it will be succeeded like this.
But, if your IP configuration is static, in this part you will fail. Dont worry, just select
Configure Network Manually and fill in the configuration depend on your ISP configuration that they gave to you.
Example :
10. The next part is hostname configuration. Hostname is name of your computer. Just fill it with one name that you want.
Note: Dont use space okay!
11. Then, you need to input your domain name too. Remember, this domain just can be used in local network only. So don't use top level domain which used in the internet like
.com, .org, .net or another else. Because i'm afraid your local domain will conflicting with internet domain. Use top level domain that doesn't exist in internet like
.handsome, .beautiful, etc. Domain that i use in this post is
belajar.cilsy.
12. Now, you are going to the Setup Username and Password part. The first, you are asked to input your Full Name. So, fill it.
Input your username too.
And input your new user password twice. One for the new password itself, and one for confirmation. Remember, do not ever use weak password! Always use words, number, capital words, and special character combination.
13. Choose
No, if it ask you to encrypt your home directory.
14. After that, you will go to the Setup Clock part. If you're connected to the internet, Ubuntu will configuring your clock automatically like the image shown below. If it is correct, select
Yes.
15. Partition part is the most difficult part of installation Ubuntu Server 12.04 LTS i think. Because for almost all beginner user think that Linux partition is definitely different with Windows partition. So be carefull guys! I really recommend you to backup all of your important data before you continue to this step.
"Sounds this step is so hard and dangerous, so what i have to do to avoid the worst risk?". Don't worry, if you dont know how to make the partition, just choose
Guided - use entire disk. The System will make the best partition for your hard disk automatically.
But if you thing that you can make your own partition, i recommend you to select
Manual.
After that, select your Hard Disk.
Finally select
Yes to write your changes to the disk.
16. When the process running, suddenly you see a form that ask you to fill a HTTP Proxy address. Just leave it blank then select
Continue.
17. For the security reasons, in this part i recommend you to choose
Install Security Updates Automaticcally because it will make your Ubuntu more safely.
18. Now, here is the Software Selection part. Ubuntu ask you to choose what softwares you want to install. Dont check anything and just leave it as default. Because with let your Server be a really fresh system is a good thing. You can install any software and service which you want after the installation process finished.
19. Finally, this is the last part. Choose
Yes in this Installation GRUB Boot Loader part.
20. Now your installation is finished. Select
Continue to reboot to your new Ubuntu system.
That's it.
Hope this post useful for you :)


