
This tutorial explains step by step how to install Guix Operating System with GNOME desktop on a virtual machine. We will use the user friendly AQEMU, thus you can exercise this too with another tools if you want. This tutorial can be viewed as a beginner's guide for you who want to try out computing with Guix. By this, we hope you find installing Guix Desktop is reasonably easier compared to any other source code based operating systems. Welcome to GNU system!

Subscribe to UbuntuBuzz Telegram Channel to get article updates.
See also Let's Try Guix.
Where To Download Guix
Guix System can be downloaded at the official website https://guix.gnu.org/en/download by choosing one of GNU Guix System installers available, either the x86_64 or the i686 edition (64-bit and 32-bit PC choices, respectively). Once downloaded, you will have a file with the name more or less looks like guix-system-install-1.3.0.x86_64-linux.iso.

What Versions are Available
Guix System is not available in multiple desktop editions so there is no Guix GNOME or Guix KDE and no LiveCD version. Instead, Guix System is available as an online installer that requires internet access to work with choices to download GNOME or Xfce at the installation time and resulting in a ready to use desktop system.
Create a New Virtual Machine
To install Guix GNOME on a virtual machine, we create one with following specifications. We use AQEMU Virtual Machine (visit our beginner's guide if you are a newcomer) to do this.
- 64-bit PC
- 2 GigaByte memory
- 20 GigaByte hard disk
- Networking enabled
- Default graphics option
- BIOS Legacy booting mode

Insert Guix System Image File
After making the virtual machine, then we insert the operating system file to it. To do so, on the unstarted Guix vm, click Media, click Add CD/DVD ROM, select the guix-system-*.iso file, image file inserted. Continue to next section.

(ISO image preparation on the virtual machine)
Boot Up Guix
After inserting the image file, then we boot up the virtual computer to run Guix System installer. To do so, click the Guix vm, click menubar VM, click Start, a display port will open acting as a monitor, Guix System installer will be displayed, you are ready to install Guix System. Continue to next section.

How To Play
Guix installer does not allow mouse click interactions. Thus, to navigate the system installer, press TAB and Shift+TAB to jump from one choice to another one and back, press SPACE to give check mark, and press ENTER to select an option.
Step 1. User Identity
- Select language
- Select territory
- Select installation type
- Select a timezone
- Select a keyboard layout
- Name your computer
1. Locale language: choose English and continue.
2. Locale location: select United States and continue.
3. GNU Guix install: select Graphical install... option and continue.
4. Timezone: select a timezone e.g. Asia/Jakarta.
5. Keyboard layout: select English (US).
6. Hostname: type a name for your Guix computer e.g. we name ours 'master'. Continue to next step.

Step 2. System Setup
- Substitute server discovery
- Create administrator account
- Create user account
- Select a desktop environment
- Enable network
1. Substitute server discovery: select Enable and continue.
2. System administrator password: create a password for root user.
3. User creation: create a username for yourself and a password.
4. Desktop environment: give check mark to GNOME among the options.
5. Network service: select Mozilla NSS Certification and continue next step.

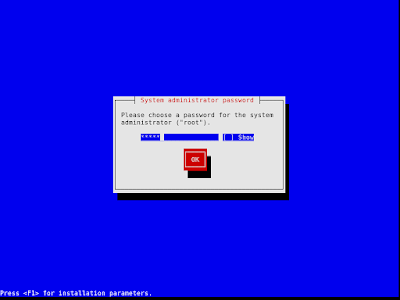
(System administrator password)


Step 3. Partitioning, Processing and Finishing
- Start Guided partitioning
- Select disk
- Select partitioning scheme
- Create required partitions
- Review the summary in form of code
- Start the actual installation
- Wait the process to finish
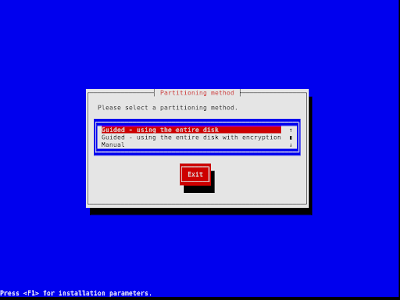
1. Partitioning method: select Guided - using the entire disk.
2. Disk: select the virtual machine's hard disk. In this example, we select ATA QEMU HARD DISK (20GB).
3. Partition scheme: select Everything is one partition.
4. Guided partitioning: the installer will display a proposal of disk partitions that will be formatted. Accept it by selecting OK. Continue.
5. Format disk?: accept this by selecting OK.
6. Preparing partitions: please wait for the disk formatting process is taking place.
7. Configuration file: the installation plan will be displayed in form of code written in a language called Scheme. Accept this by selecting OK.
8. Waiting: the actual installation process will take place. When this process takes place, do not disable your internet access and do not shutdown the virtual machine. Please wait for several minutes until you see a final message saying "Please ENTER to continue".


(Configuration file)

Restart and Login
Once finished, the installer will ask you to Reboot then press Enter and you should be able to see Guix login screen like below.
Final Result
