
This tutorial explains the installation of AlmaLinux Desktop to computer. This begins with where to grab the OS itself, make a bootable medium of it, boot the computer with it, then starts the installation and partitioning until finished. The final result will be a fully functional computer with AlmaLinux GNOME.

Download The OS
To download AlmaLinux, click here. The file size is 9GB.
Requirements
To do this AlmaLinux installation guide, you are required to prepare:
- a 64 bit computer or laptop with UEFI technology
- 2GB RAM
- 20GB free space
- a GPT-formatted hard disk drive
- a 16GB usb flash disk drive
However, if you wish virtualization instead, you can follow this guide.
Making USB Bootable
Follow bootable making tutorial to create one with the downloaded file above. You will need at least a 16GB usb flash disk to make it.
Booting
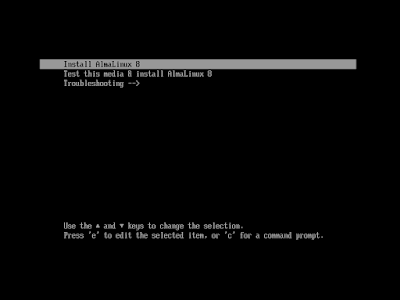
Turn your computer on with USB booting at the first priority. If your computer is UEFI-based, the boot screen will look like first picture below, but if your computer is instead BIOS Legacy-based, the boot screen will look like the second one.

(Boot screen, displayed if you computer is BIOS-based)
Once booted correctly, AlmaLinux installation screen will appear like picture below ("INSTALLATION SUMMARY"). The final aim we will do will look like picture below -- with all configurations already finished right before performing the actual installation.
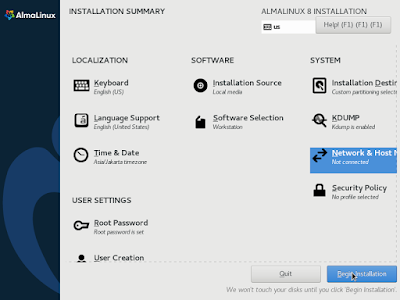
(Installation summary, our goal in this tutorial)
Step 1
Choose your keyboard layout: English (US), click Done.

Step 2
Select language support: English United States, click Done.

Step 3
Select time zone by your country, for example, Jakarta (Indonesia) and click Done.

Step 4
Select installation source, and click Done anyway.
Step 5
Select software selection section, select WORKSTATION, and select GNOME APPLICATIONS, then Done. With this, we will install AlmaLinux Desktop.

Step 6
Select root password, create your own Root Password, click Done.

Step 7
Select CREATE USER, fill your name, create your own username and password, click Done.

Step 8
Click INSTALLATION DESTINATION, select your hard disk or storage disk you wish to install AlmaLinux to, select CUSTOM at the bottom, and click Done to enter the partitioning. In this example, we already prepared a GPT-formatted hard disk by 20GB size.

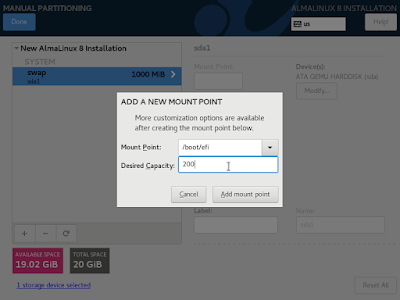
First, create partition by smallest size, it is EFI SYSTEM PARTITION by size 200 MegaBytes and by mount point /boot/efi. To start it, click plus button at bottom left of screen and you will see Add A New Mount Point > select the /boot/efi created > select filesystem: EFI SYSTEM PARTITION.
Second, create partition by middle size, it is SWAP by size 1000 MegaBytes (1 GigaByte) and by mount point swap.

Third, create partition by size remained or the biggest one, it is ROOT by remaining GigaBytes and by mount point slash sign ( / ). To do so, select slash for Mount Point and let empty Desired Capacity and click Add Mount Point. This will format your ROOT partition with XFS filesystem the default filesystem technology on Red Hat Enterprise Linux operating system.

Lastly, once all 3 partitions completed, click Done, check carefully the SUMMARY OF CHANGES then Accept Changes, and follow the next step.

Step 9

Overall, an overview of all setups will look like below. Click BEGIN INSTALLATION.

Installation process will begin.

Step 10
Once finished, installation says "Completed!" and click Reboot System and accept the license (it is a user's freedom respecting license GNU GPLv2) then you will be restarted to your new AlmaLinux.

Final Result
Successful installation will result in AlmaLinux Desktop computer like below.
