
In this article you will learn about GIMP also known as GNU Image Manipulation Program the professional free computer image editor which is famous as Photoshop alternative. With it you can edit photos, pictures, logos, and screenshots quickly for your authoring works. For example, GIMP is good for cropping and resizing photos as well as annotating and combining pictures. I present you here an introduction, how to obtain it for your computer, running it for the first time, enjoying the application environment, and making your first work. This article is the first part and all parts will be listed in GIMP for Authors started June 2020. Enjoy!
Subscribe to UbuntuBuzz Telegram Channel to get article updates directly.
1. Introduction
GNU Image Manipulation or GIMP is a free software, image editor, and cross platform application. By this description it is a clear alternative to the nonfree software Photoshop. It is originated from GNU Operating System, not from Linux, a completely free computing system for everyone forever. It is available for all computer users including those who use Windows, MacOS, and GNU/Linux. It is powered by complete features to edit digital pictures similar to other professional graphic applications. In this guide, GIMP is intended specifically to help authors who involve pictures in their writing works. If you are tutorial writers, book authors,working with any authoring works, then this guide is special for you.
Features you should be aware of in GIMP are:
- Layers - transparent pages stacked up one another. You can create any number of layers in a picture.
- Toolbox - buttons of selection, move, resize, text functionalities. You will use them frequently.
- File type - every picture has a particular format such as png, jpeg, and gif. You will save every picture by selecting it a file type.
2. Obtaining GIMP
- Microsoft Windows: download
- Apple MacOS: download
- Zorin OS: included
- GNU/Linux: Ubuntu, Fedora, openSUSE
To get GIMP on your computer, you install it.
3. Start GIMP
Open your start menu.- Find GIMP or GNU Image Manipulation Program.
- Click it.
- It starts.
- You see its window.
- To close it, click x button or close button on titlebar.
3. Getting used to GIMP environment
Here is user interface of GIMP.
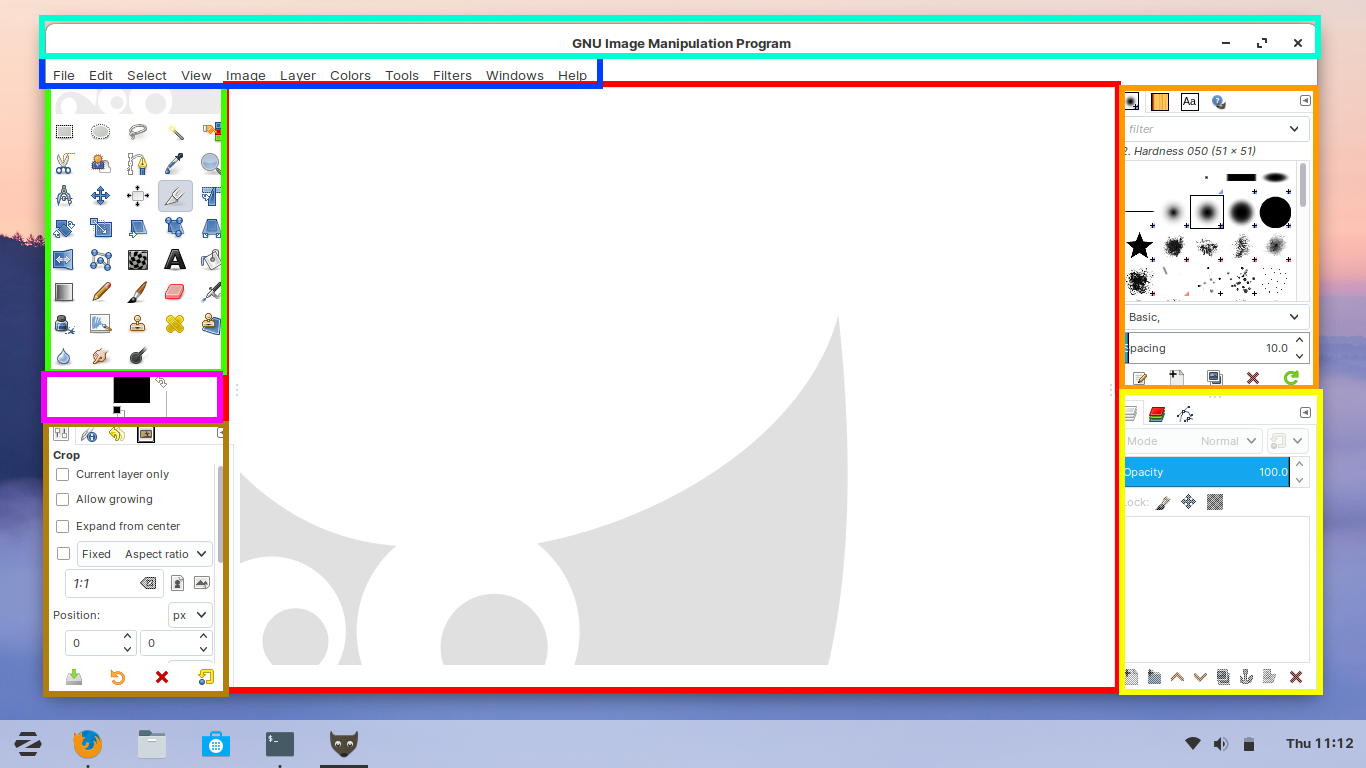
Divided into top and bottom parts:
- Top cyan: titlebar, it is the long bar with name of the application "GNU Image Manipulation Program".
- Top blue: menubar, it is where menus namely File, Edit, Select, and so on placed.
- Bottom left green: toolbox, the most accessed place, where all tools placed namely Select, Move, Text, Paint, etc.
- Bottom magenta: color box, where you choose colors.
- Bottom brown: properties box, displays active tool's options.
- Bottom red: canvas, the largest area in GIMP window.
- Bottom right orange: brushes, useful for brush and pen tools.
- Bottom right yellow: layers, where you add and remove transparent canvases.
4. Create your first picture
This is the first exercise. Download two assets below and make sure you can see them on your file manager. Simply right-click and save link as to download every item.
1st asset in PNG format 64px:

2nd asset in PNG format 120px:

Create new document with dimensions width 300px and height 100px. Drag and drop 1st asset into GIMP. Do the same to the 2nd asset. Use Move Tool to move every item. Save it as GIMP document zorin.xcf. Export it as zorin.png. See below for buttons explanations. Download the final result file under it.
- Create new image: go to menubar File > New > don't choose any template > insert width and height > OK.
- Import a picture: drag and drop from file manager into canvas. Notice the layers box increased a new layer per imported picture one over another.
- Save as: go to menubar File > Save As > insert a name > Save > a GIMP file with .xcf extension saved. This file is similar to .psd format to Photoshop. This is different to Export.
- Export: go to menubar File > Export As > insert a name with image format you desire for example photo.png for PNG or photo.jpeg for JPEG > Export > a picture file created. GIMP automatically recognizes any format based on extension. This is different to Save As.

More Exercises
Do like above for these pairs of assets. You can do variation with Crop or Resize tool. It is fun!
- Ubuntu assets: download logo and brand.
- Fedora assets: download logo and brand.
- elementary OS assets: download logo and brand.
- deepin OS assets: download logo and brand.
See Also
This guide is written to be small it does not speak wider. However, if you want to learn more about GIMP, here is a list of resources I selected for you.
- What is GIMP? - Wikipedia page explaining GIMP with all basic information needed.
- Official User Manual - references to learn GIMP by reading. Notice that this official website is completely linked to everything important such as tutorials, books, facebook and twitter social medias, wiki, and more.
- Davies Media Design - for Inkscape there is Logos By Nick and for GIMP there is Davies Media Design on youtube for you to learn by videos.
This article is licensed under CC BY-SA 3.0.