
This tutorial will help you install Ubuntu 22.10 operating system into your computer explained with pictures step by step. Codenamed Kinetic Kudu, it is the latest version of Ubuntu, the world most popular OS from the FOSS community. By reading this tutorial, you will be able to install Ubuntu into you PC and laptop in easy and safe ways without worry of accidentally deleting data. Now let's exercise and happy installing!
Subscribe to UbuntuBuzz Telegram Channel to get article updates.
About Ubuntu
 Ubuntu is a world-class computer operating system from United Kingdom developed by Canonical and the Community. It is available on various kinds of computer including desktop, laptop, server, embedded devices and Internet of Things. It is a free/open source software (FOSS) distribution derived from Debian GNU/Linux and the most popular in the world from its kind. The name Ubuntu is taken from an ancient African language, meaning, humanity for others. Visit Ubuntu.com.
 Installation Plan
We will install the OS into computer using an external, inexpensive USB flash drive as a hard disk replacement. This is a clever yet safe way to enable many people including novices to install Ubuntu (alongside with Windows, if any) without worry losing their data even repeating the steps if failed. In other words, this method allows maximum benefits while reducing risks to minimum. For experienced users, you can still exercise this tutorial by adapting it to your needs. For example, simply change flash disk back to hard disk as the storage.
Installation Requirements
Considering the plan, you will need:
- 1 x USB flash drive >= 8GB will be used as bootable medium.
- 1 x new USB flash drive >=32GB will be used as as hard disk.
- 1 x 64-bit computer or laptop.
- 1 x Ubuntu 22.10 Kinetic Kudu image file.
Backup
It is wise to make backup (copy) of all your hard disk data and save them somewhere else before doing Ubuntu installation. It is even wiser for novices. If the worst thing happened, at bare minimum you had the copy of all your data and do not lose them. You can do it by simply copying everything to external hard disk drive(s). If you considered making backup online, please encrypt it first before uploading.
Below you will read the full guide from "---START---" to "---FINISH---".
---START---
Download Ubuntu 22.10
Firstly, you must have a copy of Ubuntu 22.10. Download it from Kinetic Kudu download links here. You will get an ISO image file named ubuntu-22.10-desktop-amd64.iso. After downloading, continue to next step.
Making Installer Medium
Now, you should write the ISO image file into the first flash drive using a utility program on your existing operating system. Regardless you are currently using Windows, MacOS, or GNU/Linux, follow our tutorial Ubuntu Medium Creation Guide. After making one, continue next section.
Booting Up
- Plug the first flash drive in a USB port.
- Power on your computer.
- You should boot into Ubuntu 22.10 from your first flash drive.
- Select TRY UBUNTU instead of Install Ubuntu if asked.
- You see Ubuntu Desktop on your screen.
- Continue next section.
Plug Second Flash Drive In
- Now, plug your second flash drive in.
- Ubuntu will show it as a new drive.
- You will install Ubuntu 22.10 from first flash drive to second flash drive.
- Continue next section.
Start Installation
- Double-click Install Ubuntu 22.10 icon on desktop.
- Ubuntu Installer (also known as Ubiquity) will open.
- You are ready to perform the installation.
- Continue to Step 1.
Step 1. Select Language
Select English and click Continue.

Step 2. Select Keyboard Layout
Select English (US) and click Continue.

Step 3. Select Networking
Select I don't want to connect ... and click Continue.

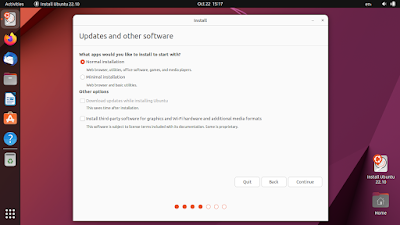
Step 4. Select Install Mode
Select Normal Installation and click Continue.
Step 5. Create Partitions
Select Something Else (also known as Manual) and click Continue. This time you must create three disk partitions in the second flash drive. We give you example /dev/sdc is our second flash drive so we will partition in there.

Create EFI partition
- Select free space under the second flash drive.
- Click New.
- Fill the size 300 megabytes.
- Fill the use as EFI SYSTEM PARTITION.
- Click OK.
- First partition, EFI, created.
- Continue next step.

Create SWAP partition
- Select free space under the second flash drive.
- Click New.
- Fill the size 1000 megabytes.
- Fill use as swap area.
- Click OK.
- Second partition, SWAP, created.
- Continue next step.

Create ROOT partition
- Select free space under second flash drive.
- Click New.
- Let the size as is, don't change it.
- Select the use as EXT2 Filesystem. (For hard disk drive, select EXT4 instead.)
- Select the mount point slash character ( / ).
- Click OK.
- Third partition, ROOT, created.
- Continue next step.

Select bootloader partition
- See under Boot Loader section.
- Select your EFI System Partition as the location.
- For example, as above the EFI is /dev/sdc1, then bootloader should be the same /dev/sdc1 too.
- Continue next step.

View Installation Summary
- Click Install Now.
- A summary will show.
- Read carefully the summary and please make sure no mistakes in it.
- If there is a mistake, click Cancel and fix the mistake.
- Click Continue if you are sure no mistakes in the summary.
- You started the actual installation and cannot go back.

Start Installation
- To this point, the process is already started and you will see the next major step.
- Continue.

Step 6. Select Timezone
On the world map, select your time zone. For example, we selected Asia/Jakarta as we live in Western area of Indonesia. Once selected, continue next step.

Step 7. Create username and password
On the password creation, fill all the blanks with your first name (for convenience) or you can create any username and password as you wish (for security). Continue next step once created.

Step 8. Wait and Finish
Ubuntu Installer will ask you to wait and show a beautiful presentation about Ubuntu and Canonical. You may consider to sip a cup of coffee or play with kids while it progressing. We can confirm this only takes 30 minutes or less on an old, low-end computer with a new SanDisk CruzerBlade flash drive (that means, should be faster on a better computer).

Once finished, Ubuntu will notify you on the screen that Installation Complete. When this shows, click Restart Now. Continue next step.

Step 9. Remove medium and Restart
Ubuntu will show black screen and ask you to remove installation medium then press Enter. Do it by removing the first flash drive but don't remove the second one and press Enter. Computer will now restart. Continue last step.
Step 10. Final Result
Once restarted, finally your computer is now powered by Ubuntu 22.10 Kinetic Kudu. Remember that these procedures store your Ubuntu system in the second flash drive not your hard disk. Congratulations!

Dualbooting
Your computer is already dualbooted by exercising procedures above. It means, in one computer, there are two operating systems, Ubuntu and Windows (for most cases). When you plug your Ubuntu flash drive in, you can run your computer with Ubuntu. When you don't, your computer will run Windows. It's as simple as that.
Portability
Your Ubuntu is already portable by exercising procedures above. Try to use the second flash drive on another computer and see if Ubuntu 22.10 can run there. If it runs (and mostly it will), you find that our Ubuntu installation is portable.
Happy installing!
---FINISH---
Available Ubuntu Preinstalled Computers
Aside from doing installation by hand, you might also considering to purchase a computer or a
laptop preinstalled with Ubuntu. It is the same thing with getting a Windows laptop
or a MacBook as the software installation has been finished by the
manufacturer making the product fully ready to use. Such production for
Ubuntu is already available from vendors below:
Lenovo
lenovo.com/us/en/d/linux-laptops-desktops
Lenovo
offers Ubuntu preloaded workstations with their PC and laptop products
namely ThinkPad Carbon and ThinkStation with ability to select CPU
configuration between Intel Core i7 Gen. 12th or AMD Ryzen Threadripper
before ordering. Selecting Ubuntu as operating system will reduce the
cost.
Dell
dell.com/en-us/lp/linux-systems
Dell, the US manufacturer, since 20 years ago offers Ubuntu preloaded workstations with their PC and laptop products namely XPS, Latitute, Precision and OptiPlex. Selecting Ubuntu instead of Windows as the OS will reduce the cost.
System76
System76,
since 2005, produces GNU/Linux-preloaded workstations with their
desktops, laptops and servers namely Galago, Lemur, Darter, Thelio and
many others. Ubuntu is available aside from their own brand system
Pop_Os!.
Tuxedo
This article is licensed under CC BY-SA 3.0.